| Description | Press this key |
| Display or hide the Start menu | WIN |
| Lock the computer | WIN+L |
| Display the System Properties dialog box | WIN+BREAK |
| Show the desktop | WIN+D |
| Open Computer folder | WIN+E |
| Search for file or folder | WIN+F |
| Search for computers | CTRL+WIN +F |
| Display Windows Help | WIN+F1 |
| Minimize all the windows | WIN+M |
| Restore all minimized windows | WIN+SHIFT+M |
| Open the Run dialog box | WIN+R |
| Show Flip 3D | WIN+TAB |
| Open Ease of Access Center | WIN+U |
| Open Windows Mobility Center | WIN+X |
Saturday, August 27, 2011
Common Windows Shortcuts
Friday, August 26, 2011
Get Rid of Duplicate Images on your Computer
You can have duplicate images on your computer for mostly three reasons:
#1. You transferred a set of pictures from the digital camera to your computer but did not erase them from the camera. Thus when you re-connected the camera, they got copied again to your hard drive but in a different location.
#2. You made some minor edits to a picture – let’s say you cropped it or fixed the rotation – and your image editing program saved the edited image as well as the original picture.
#3. You may also have images on your computer that are “loose duplicates” of each other. That means the images are mostly identical except for very minor variations – often happens when you capture multiple frames in quick succession.
1. Deleting Duplicate Images
If you are only looking to find and remove images that are “exact” duplicates of each other, Google’s Picasa desktop software could be a good solution. Just import all your picture folders into Picasa and then choose Tools –> Experimental –> Show Duplicate Files to see a list of potential duplicates.
While removing duplicate images with Picasa, please remember that the software will list all copies that are found of an image including the original one. You therefore need to keep one of these copies and delete the rest as demonstrated in the above screencast.
Alternatively, create a separate folder that’s not included in Picasa and move all the potential duplicate photographs to that folder instead of deleting them.
Related reading: How to Backup your Photos
Now Picasa is a good solution for deleting identical duplicates but your disk may also be storing have pictures that look similar visually but may differ as far as pixels or bytes are considered. Such files won’t be recognized by Picasa as duplicates but VisiPic, a tiny utility for Windows, can come really handy here.
2. Deleting Similar Images
To get started, launch the program and click File –> Add Folder to add folder(s) that you want to scan for duplicates. Then slide the Filter to somewhere between “Strict” and “Basic” so that program may group images that are similar or only slightly different. Hit play to begin scanning for duplicates.

To eliminate the duplicates, just move your mouse over the thumbnails and left-click the pictures you want to delete. They’ll be marked with a recycle bin icon and you may then either choose “Delete” or even “Move” to transfer them to a separate folder.
The tool is also smart enough to auto-select images for deletion that either have lower resolution or lower file-size than the original image.
#1. You transferred a set of pictures from the digital camera to your computer but did not erase them from the camera. Thus when you re-connected the camera, they got copied again to your hard drive but in a different location.
#2. You made some minor edits to a picture – let’s say you cropped it or fixed the rotation – and your image editing program saved the edited image as well as the original picture.
#3. You may also have images on your computer that are “loose duplicates” of each other. That means the images are mostly identical except for very minor variations – often happens when you capture multiple frames in quick succession.
1. Deleting Duplicate Images
If you are only looking to find and remove images that are “exact” duplicates of each other, Google’s Picasa desktop software could be a good solution. Just import all your picture folders into Picasa and then choose Tools –> Experimental –> Show Duplicate Files to see a list of potential duplicates.
While removing duplicate images with Picasa, please remember that the software will list all copies that are found of an image including the original one. You therefore need to keep one of these copies and delete the rest as demonstrated in the above screencast.
Alternatively, create a separate folder that’s not included in Picasa and move all the potential duplicate photographs to that folder instead of deleting them.
Related reading: How to Backup your Photos
Now Picasa is a good solution for deleting identical duplicates but your disk may also be storing have pictures that look similar visually but may differ as far as pixels or bytes are considered. Such files won’t be recognized by Picasa as duplicates but VisiPic, a tiny utility for Windows, can come really handy here.
2. Deleting Similar Images
To get started, launch the program and click File –> Add Folder to add folder(s) that you want to scan for duplicates. Then slide the Filter to somewhere between “Strict” and “Basic” so that program may group images that are similar or only slightly different. Hit play to begin scanning for duplicates.
To eliminate the duplicates, just move your mouse over the thumbnails and left-click the pictures you want to delete. They’ll be marked with a recycle bin icon and you may then either choose “Delete” or even “Move” to transfer them to a separate folder.
The tool is also smart enough to auto-select images for deletion that either have lower resolution or lower file-size than the original image.
Online Account Security Enhancements.
A Security Checklist for Online Accounts
#1. I have enabled the “Always use HTTPS” setting for Facebook, Twitter, Gmail, Google and all the other online services that support secure HTTP. This is especially important when accessing Internet over a Wi-Fi network because without HTTPS, anyone (and not just skilled hackers) can capture your login details using Firesheep, a simple Firefox extension.#2. I have a few Google Accounts and they all use 2-step verification now. That means if someone tries to log into my Google account from a different computer, they’ll have to type an additional code that is sent directly to my mobile phone as an SMS text message or over a voice call.
#3. The 2-step verification can also alert you to potential hacking activity. If I ever get an SMS (or a voice call) from Google with the verification code but without requesting one, it is an immediate hint that someone knows my password though they won’t be able to get in without entering the verification code.
#4. I have connected my mobile number with my Facebook account. This is extremely important because I get an instant SMS and an email alert whenever my Facebook account is accessed from a different computer or another mobile phone.
#5. I carefully reviewed third-party sites that have access to my online accounts and revoked access to all the unwanted apps that I no longer use. In case you wish to do the same for your accounts, here are the direct links for Facebook, Google and Twitter.
#6. I maintain two email addresses – one is public that is displayed on the blog while the other email address is known to a select few. Why?
6a. The public email address is associated with services like Twitter, YouTube, Facebook, Foursquare, LinkedIn, Flickr, Tumblr, Posterous, Skype and a couple of other social sites where I want people to find me if they have my email address in their address book.
6b. I use the other “secret” email address with services like Dropbox, Amazon, Google Apps, my bank, my hosting service, Apple iTunes, PayPal and few other places where account security is even more critical and where I am not looking to get social.
#7. If I am testing a new online service, I almost always use a disposable email address to create a test account with that service. Some online services reject disposable addresses to prevent fake registrations but the one I use goes through as it is only an alias (or nickname) of my main email address.
#8. I prefer using a virtual credit card with shopping sites that I am either using for the first time or where the fine print is too long and there’s a risk that I could be billed again if I don’t cancel the account. This also helps keep my credit card safe from relatively unknown sites.
#9. Once in a while, I do mock drill with my most important online accounts to test the various recovery options I would have in case I forget my password or if I lose access to my secondary email address or misplace my mobile phone.
#10. The last point - how do I remember and manage so many different passwords?
Some people prefer to use password managers which are very convenient but at this time, all I use is a simple 1-page document (see sample) to store information of all my online accounts and the corresponding passwords. This file is password-protected and I put it on Dropbox so the information is available on all my computers.
This may surprise some but I also have a hard copy of this file that family members can refer to in case I am travelling and they need urgent access to any of my online accounts. Also, since they would need my mobile phone to access my Gmail or Google account, I have included backup verification codes in the printed document itself – thus the Google account can be used without requiring the phone.
One more thing. If you have two email accounts, never ever set one emails as the secondary (or recovery) email address of the other. That’s because if one of your email accounts gets compromised, the hacker can easily take over the other account as well.
Thursday, August 25, 2011
Access your computer files from anywhere.
Scenerio: You have documents, photos, music and other important files on the home computer. How can you “remotely access” these files from your office computer or, when you are travelling, from your mobile phone?
Solution: The simplest solution would be that you copy all your data from the home computer on to a portable hard drive and carry it around but this is obviously a bit cumbersome approach as it requires you to manually sync the home computer and your portable disk.
Access Files on your Computer over the Internet
There are couple of ways by which you can retrieve files stored on your home computer from anywhere else using a regular Internet connection.Option 1: Using Online Backup
You can use an online backup service like SugarSync, Carbonite, SkyDrive or even Dropbox – they provide desktop utilities that will automatically upload files on your home computer to the Internet and you can then access these files through the web browser of any other Internet connected computer.
The upside is that your files will always be available to you even if the home computer is not running. SugarSync and Carbonite have a mobile optimized website so you can access files from any mobile phone as well.
Option 2: Using Desktop Sharing Software
There are free desktop sharing software like TeamViewer and UltraVNC that also let you remotely access your computer files from anywhere else. LogMeIn Pro and CrossLoop Home are some other good options for transferring files from a remote computer but these are paid services.
If all your computers are running Windows, you can use the built-in remote desktop connection feature of Windows (available in XP and later) to access your home computer from another Window computer over the Internet.
With Desktop Sharing software, you’ll always have access to all your files but one big limitation is that it requires that the remote computer stays on. Also, none of these options will help you access files on a mobile phone except LogMeIn which has an iPhone app.
Option 3: Access Files Directly through the Browser
Online backup services, discussed above, will copy files to their own servers before you can access them for anywhere else. Screen sharing services are often slow and they won’t work on most mobile devices. Let’s now explore another set of services that allow you download files directly from the home computer.
Copernic, like Google Desktop, is a popular desktop search software that you may use to find emails, documents and other files on your Windows computer. They have a paid component called myCopernic on the Go that lets you remotely search for content stored on the home or office computer. You can preview the search results and then download them to your mobile phone or remote PC.
With Opera Unite, you can easily turn your computer into a web server and instantly access files and folders on that computer from any other web browser (including that of mobile phones). Opera Unite is a standard web server and therefore you’ll be downloading files directly from the computer – they’re not uploaded anywhere else.
Another option is GBridge that lets you setup a virtual private network using your existing Google Account. Companies use VPNs to let employees access corporate data over a public network (Internet) and with GBridge, even home users can build their own VPNs to access remote files more securely.
Windows Live Sync at sync.live.com is another great choice for remotely accessing files over the Internet. Just install the Live Sync client on your computer and you can then access the entire hard drive of that computer simply through the Windows Live Sync website.
Live Sync is available for both Mac and Windows. The new version of Live Sync is even better and it has integrated online storage (Live Mesh) so you’ll be able to access your important file even if the remote computer is off.
Finally, you may also want to check out HomePipe – this is an extremely easy and free service that lets you access your home files and media from any other computer or mobile phone. Install the HomePipe Agent and all files on that computer will instantly become available through the web. They also have apps for iPhone and Android phones.
Sharing Large files Over Internet.
A: Share Large Files over Email
The Gmail service cannot handle email attachments that are larger than 25 MB but the recently-revamped Hotmail service is a much better alternative as it lets you send email messages as large as 10 GB.The maximum size of an individual file that you can attach to an Hotmail message is only 50 MB but you can use a file-splitting utility like HJ-Split to break a big file into smaller chunks and then attach them all to a single message. The recipient can then join these chunks to restore the original file and he can do without requiring external programs.
B: Share Large Files without Email
The downside with email attachments is obvious - most ISPs and web-based email programs (including Gmail) will reject incoming messages that have big attachments and therefore, if you are sending a bulky file via email, the recipients also have to be on Hotmail as well in order to receive that file.One of the best options for sharing large files without email is Dropbox. Once you install the the Dropbox utility on your (Windows, Mac or Linux) desktop, you can upload files of virtually any size to the Internet - it’s only limited by the size of your Dropbox storage which is 2GB in the case of free accounts. Alternatively, if you don’t want to install Dropbox, you can upload files straight to the Dropbox website from your browser but the limit in this case is 300 MB per file.
You can even consider using Google Docs to share those big files over the Internet. Google Docs lets you upload files up to 250 MB in size and they can be in any format. You have 1 GB of free storage space for storing all the non-Office files on Google Docs but you can also buy more space for a reasonable fee.
Unlike FTP servers, services like Google Docs and Dropbox don’t support resumable downloads. That means if the connection breaks while the recipient is still trying to download your “huge” file, he or she will have to resume the download from scratch. That can be a deal-breaker for lot of people.
SkyDrive, part of the Windows Live family, can solve this problem in a way.
The service offers 25 GB of free online storage, with individual files limited to 50 MB. To upload a large file, split it into chunks of 50 MB each and then upload them all to a single folder on SkyDrive. The recipient can download the entire folder as a ZIP or, if he’s on a flaky connection, he can download files one by one and then join them all at his end.
C. Share Files without Registration
Finally, if you are looking for something quick and simple that doesn’t even require registration, talk to YouSendIt or WeTransfer (if the file size is really big). Just upload the files via the browser, enter the email address of the recipient and hit send. WeTransfer lets you send files up to 2 GB in size while the maximum allowed limit is 100 MB in the case of YouSendIt (free version).Chart: Comparison of file sharing services

Saturday, August 13, 2011
XP Auto Log Off
Steps for rectifying this problem:
You need to Edit these values and type the correct path of shell :
Shell = explorer.exe
Userinit=X:\windows\system32\userinit.exe
NOTE: These files may also be deleted by spywares. You may need to extract them using Windows CD.
Log on to a networked computer.
Run Regedit.exe
Point your cursor to HKEY_LOCAL_MACHINE
Select File > Connect Remote Registry
Type computer name (infected computer)
Navigate to the following location in registry of destination or infected computer
HKLM\Software\Microsoft\Windows NT\CurrentVersion\Winlogon
Edit these two values in right pane:
Shell
Userinit
Shell
Userinit
Change these two values to
Shell=explorer.exe
Userinit = x:\windows\system32\userinit.exe
Exit from Registry
Restart Infected computer.
You should be able to log on to computer.
if it not work then go to back steps and just copy orwrite the file userinit.exe
For technical contact:-
Nike
support@leniotech.com or visit us at http://www.leniotech.com/
Friday, August 12, 2011
Virtual Memory is Low
If your computer lacks the random access memory (RAM) needed to run a program or operation, Windows uses virtual memory to compensate.
Virtual memory combines your computer’s RAM with temporary space on your hard disk. When RAM runs low, virtual memory moves data from RAM to a space called a paging file. Moving data to and from the paging file frees up RAM to complete its work.
The more RAM your computer has, the faster your programs will generally run. If a lack of RAM is slowing your computer, you might be tempted to increase virtual memory to compensate. However, your computer can read data from RAM much more quickly than from a hard disk, so adding RAM is a better solution.
If you receive warnings that your virtual memory is low, you'll need to increase the minimum size of your paging file. Windows sets the initial minimum size of the paging file at the amount of random access memory (RAM) installed on your computer plus 300 megabytes (MB), and the maximum size at 3 times the amount of RAM installed on your computer. If you see warnings at these recommended levels, then increase the minimum and maximum sizes. To change the size of the virtual memory :
Error Message " NTLDR is missing"
NTLDR ( NT loader) is the boot loader for all releases of Microsoft's Windows NT operating system up to and including Windows XP and Windows Server 2003. NTLDR is typically run from the primary hard disk drive, but it can also run from portable storage devices such as a CD-ROM, USB flash drive, or floppy disk Drive.
NTLDR requires, at the minimum, the following two files to be on the system volume:
- NTLDR, which contains the main boot loader itself
- boot.ini, which contains configuration options for a boot menu
To Solve the Issues related to NTLDR you need the setup CD and need to repair the Operating System. Do the following:
Boot using Windows Setup CD and enter into "Recovery Console" by pressing "R". Now Log into windows installation and enter admin password. Now give following commands at prompt:
copy x:\i386\ntldr c:\
copy x:\i386\ntdetect.com c:\
Where "x" is your CD drive, change it acc. to your system.
copy x:\i386\ntldr c:\
copy x:\i386\ntdetect.com c:\
Where "x" is your CD drive, change it acc. to your system.
Wednesday, August 10, 2011
Fix Print Spooler Service Error
What is Print Spooler?
Reasons of Print Spooler Error
Print Spooler is windows service responsible for managing all print jobs currently being sent to the computer printer or print server. The print spooler program allows you to delete a print job being processed or otherwise manage the print jobs currently waiting to be printed.
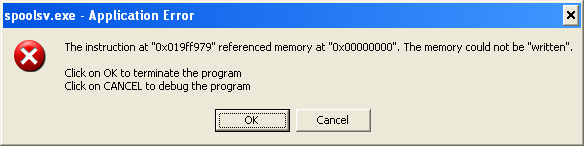
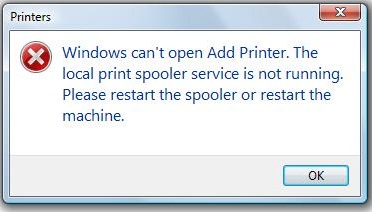
How Print Spooler Error looks like?Here are couple of examples of how it can look like:
Reasons of Print Spooler Error
There is 3 common reasons of Print Spooler Error:
1) Spooler Files corruption
2) Spooler registry entries corruption
3) Printer driver incompatibility.
Files can become corrupted under the influence of printing software, malicious activity (spooler virus), and even after Windows Update. Printer driver incompatibility is an actual problem for old printers, when last released driver is not compatible with new operating system.
Fix Print Spooler Error!
Instructions
You can download files mentioned in manual from DLL files directory or even copy them from you friends PC.A)
1) Run Spooler Fix Wizard, fix the problems
2) boot your system in safe mode
3) locate “spoolsv.exe” file in c:windows\system32\ folder
4) replace it with downloaded file
5) do the same with files spoolss.dll and localspl.dll
6) boot your system in normal mode
2) boot your system in safe mode
3) locate “spoolsv.exe” file in c:windows\system32\ folder
4) replace it with downloaded file
5) do the same with files spoolss.dll and localspl.dll
6) boot your system in normal mode
B)
1) press win + r on your keyboard
2) type in “regedit” without quotes
3) locate this tree node HKEY_LOCAL_MACHINE\SYSTEM\CurrentControlSet\Services\Spooler
4) to the right-hand side of the window locate “imagepath” icon
5) double-click on it and type in C:\WINDOWS\system32\spoolsv.exe and press enter
6) reboot
2) type in “regedit” without quotes
3) locate this tree node HKEY_LOCAL_MACHINE\SYSTEM\CurrentControlSet\Services\Spooler
4) to the right-hand side of the window locate “imagepath” icon
5) double-click on it and type in C:\WINDOWS\system32\spoolsv.exe and press enter
6) reboot
C)
1) right-click on “My computer”, select “manage”
2) locate “services in services and applications”, click on ‘services’
3) to the right-hand side locate “print spooler” service, double-click on it
4) set startup type as “Automatic”, apply
5) start the service.
2) locate “services in services and applications”, click on ‘services’
3) to the right-hand side locate “print spooler” service, double-click on it
4) set startup type as “Automatic”, apply
5) start the service.
For technical contact:-
Fix a corrupted user profile
If you tried to log on to Windows and received an error message telling you that your user profile might be corrupted, you can try to repair it. You will need to create a new profile, and then copy the files from the existing profile to the new one.
To create a new user profile
To create a new profile, you must first create a new user account. When the account is created, a profile will also be created.
- Open User Accounts by clicking the Start button
 , clicking Control Panel, clicking User Accounts and Family Safety (or clicking User Accounts, if you are connected to a network domain), and then clicking User Accounts.
 - Click Manage another account.
 If you are prompted for an administrator password or confirmation, type the password or provide confirmation.
 - Click Create a new account.
- Type the name you want to give the user account, click an account type, and then click Create Account.
To copy files to the new user profile
After you create the profile, you can copy the files from the existing profile. You must have at least three user accounts on the computer to complete these steps, including the new account you just created.
- Log on as a user other than the new user you just created or the user that you want to copy files from.
- Open Documents by clicking the Start button, and then clicking Documents.
- Click the Tools menu, and then click Folder Options.If you don't see the Tools menu, press ALT.
- Click the View tab, click Show hidden files and folders, clear the Hide protected operating system files check box, and then click OK.
- Locate the C:\Users\Old_Username folder, where C is the drive that Windows is installed, and Old_Username is the name of the profile you want to copy files from.
- Select all of the files and folders in this folder, except the following files:
- Ntuser.dat
- Ntuser.dat.log
- Ntuser.ini
-
- Click the Edit menu, and then click Copy.If you don't see the Edit menu, press ALT.
- Locate the C:\Users\New_Username folder, where C is the drive that Windows is installed, and New_Username is the name of the new user profile you created.
- Click the Edit menu, and then click Paste.If you don't see the Edit menu, press ALT.
- Log off, and then log back on as the new user.If you have e-mail messages in an e-mail program, such as Windows Mail, you must import your e-mail messages and addresses to the new user profile before you delete the old profile. If everything is working properly, you can delete the old profile.
How To Delete Cookies, Temp Files On A Computer
Cookies are small files that can be placed on your computer when you visit a website. They often serve as identifiers and sometimes to store custom parameters in
To clear cookies in Internet Explorer do the following: Start the web browser and click on Tools > Safety > Delete Browsing History.
 Make sure Cookies is selected. A click on Delete removes all Internet Explorer cookies from the system. Sometimes you may want to delete specific cookies only. To do this click on Tools > Internet Options.
Locate the Settings button under Browsing History in the General tab. Click the View files button there.

This opens the temporary Internet files in Windows Explorer. My suggestion would be to change the folder view mode to details and sort the files by name or Internet address.

You can now delete cookies selectively in Windows Explorer.
Mozilla Firefox
Click on Tools > Clear Recent History or press Ctlr-Shift-Del to open the configuration window. Here you can clear all cookies stored in the Firefox web browser. Make sure to select everything from the time range pull down to delete all cookies.

Click Tools > Options > Privacy if you want to delete only some cookies in the Mozilla Firefox web browser. Select Show Cookies from the interface. This opens a list of all cookies that are currently stored in the web browser.

Simply select a cookie from the listing and click the remove cookie button afterwards to delete that cookie from the browser.
Google Chrome
Click on Wrench > Tools > Clear Browsing Data to delete cookies in Google Chrome.

Google Chrome is currently the only browser that links directly to Adobe Flash Player storage settings which makes it easier to delete Flash cookies as well.
The delete some cookies in Google Chrome open chrome://settings/content in the address bar and select the All cookies and site data button.
All cookies stored in Google Chrome are listed on that page. Just click on a cookie and then on the little x on the right side to delete that cookie.

Opera
Opera users need to click on Menu > Settings > Delete Private Data to delete cookies. They can delete all cookies under that menu, or click on the Manage Cookies button to see a list of all stored cookies on the system, and options to delete them selectively.


Temporary Internet Files is the name of a folder (directory) on your hard disk that is used by Internet Explorer to store Web pages, images, audio and video files, and other content from the Web sites that you are visiting. This folder is also known as the cache of Internet Explorer.
Despite these positive things about Temporary Internet Files, there is one big drawback: they compromise your privacy. They are called temporary but they are never deleted unless the cache is full and the Temporary Internet Files can reach very large size on the modern computers. Everyone with access to your computer can look into your Temporary Internet Files folder and see the sites that you have visited in the past.
All web browsers offer the means to delete cookies right in the browser.
Internet Explorer
Locate the Settings button under Browsing History in the General tab. Click the View files button there.
This opens the temporary Internet files in Windows Explorer. My suggestion would be to change the folder view mode to details and sort the files by name or Internet address.
You can now delete cookies selectively in Windows Explorer.
Mozilla Firefox
Click on Tools > Clear Recent History or press Ctlr-Shift-Del to open the configuration window. Here you can clear all cookies stored in the Firefox web browser. Make sure to select everything from the time range pull down to delete all cookies.
Click Tools > Options > Privacy if you want to delete only some cookies in the Mozilla Firefox web browser. Select Show Cookies from the interface. This opens a list of all cookies that are currently stored in the web browser.
Simply select a cookie from the listing and click the remove cookie button afterwards to delete that cookie from the browser.
Google Chrome
Click on Wrench > Tools > Clear Browsing Data to delete cookies in Google Chrome.
Google Chrome is currently the only browser that links directly to Adobe Flash Player storage settings which makes it easier to delete Flash cookies as well.
The delete some cookies in Google Chrome open chrome://settings/content in the address bar and select the All cookies and site data button.
All cookies stored in Google Chrome are listed on that page. Just click on a cookie and then on the little x on the right side to delete that cookie.
Opera
Opera users need to click on Menu > Settings > Delete Private Data to delete cookies. They can delete all cookies under that menu, or click on the Manage Cookies button to see a list of all stored cookies on the system, and options to delete them selectively.
For technical contact:-
New Features Of Window 7
1. Opening multiple Instances of the same program
Want to open multiple instances of the same program? Maybe a second command prompt or another application that can be opened in multiple instances? Instead of opening the program again the usual way you can simply press the SHIFT key and left-click on the first instance in the Windows Taskbar to open a second one.
2. Problem Steps Recorder
If you ever had to do phone support you know how hard it can be to understand what the user on the other end of the phone did and wants. The Problem Steps Recorder is a sweet little tool in Windows 7 that can be used by the user to record his steps.

All that the user needs to do is start the recorder by entering psr in the Start Menu box and click on Start Record in the program interface. Screenshots will be taken from user actions. It is possible to add comments at any time if the user feels so. The whole recording will be saved as a zip file containing a slideshow of the actions.
3. Pin Favorite Folders
Want to add a favorite folders to Windows Explorer to be able to access them faster? Just drag and drop the folder to the favorites menu. It will remain there until you delete it with the delete key again.
4. Moving Windows and such
Windows 7 introduces several new keyboard shortcuts for window management. Some useful ones are:
- [Windows Shift Left Arrow] or [Windows Shift Right Arrow] to move windows from one computer monitor to another.
- [Windows Left Arrow] or [Windows Right Arrow] to dock windows to the left or right side
- [Windows Up Arrow] to maximize a window
- [Windows Down Arrow] to restore or minimize windows
- [Windows Home] to minimize all windows but the active one
5. Shortcuts to start pinned taskbar items
Pressing [Win Number] will start a new instance of a pinned taskbar item. You should also note that the items can be dragged and dropped into different positions easily.
How To Turn On Windows Games
- Click the Start button
 , click Control Panel, click Programs, click Programs and Features, and then click Turn Windows features on or off.
  If you're prompted for an administrator password or confirmation, type the password or provide confirmation.
 - Select the Games check box, and then click OK.
Restrict Usage Of USB Removable Disks
Portable USB flash drives are indeed very handy, but they can also be used to upload malicious code to your computer either deliberately or by accident or to copy confidential information from your computer and take it away. In that case if you want to restrict usb removable disk access than do the following:
To block your computer's ability to use USB Removable Disks follow these steps:
- Open Registry Editor.
- In Registry Editor, navigate to the following registry key:
HKEY_LOCAL_MACHINE\SYSTEM\CurrentControlSet\Services\USBSTOR- Locate the following value (DWORD):
- Close Registry Editor. You do not need to reboot the computer for changes to apply.
Enable usage of USB Removable Disks
To return to the default configuration and enable your computer's ability to use USB Removable Disks follow these steps:- Go to the registry path found above.
- Locate the following value:
Start and give it a value of 3. You can download a .REG file that configure this setting right HERE (1kb).
Tuesday, August 9, 2011
Ways To Improve Display Quality
The visual appearance of your computer's display can be influenced by several factors. The monitor you use and its settings, how Windows is configured, and how you use your computer can all have an effect on display quality.
To ensure your monitor is calibrated correctly, refer to the instructions that came with your monitor. To learn how to configure Windows display settings, see Getting the best display on your monitor.
Trying to run too many programs at the same time can cause display problems such as jittery or choppy video. If you notice erratic or reduced visual performance on your computer, try one or more of the actions described below.
Windows chooses the best display settings, including screen resolution, refresh rate, and color, based on your monitor. These settings differ depending on whether you have an LCD or a CRT monitor. If you want to adjust your display settings or, if these settings were changed and you want to restore default settings, use the following recommendations.
For both type of monitors, it's typical that the higher the dots per inch (DPI), the better the fonts will look. For more information, see Make the text on your screen larger or smaller.
 The difference between high DPI and low DPI
The best display for an LCD monitor
If you have an LCD monitor, check your screen resolution, which helps to determine the clarity of on-screen images and objects. It's a good practice to set LCD monitors to the native resolution—the resolution a monitor was designed to display best, based on its size. The monitor manufacturer or reseller should be able to provide the native resolution. If you can't get this information, you can try setting the monitor to the highest available resolution, which is usually the native resolution. See Change screen resolution.
 If you don't know what your monitor's native resolution is, set it to the highest possible resolution
LCD monitors can technically support lower resolutions than their native resolution, but the image might be small, centered on the screen, and edged with black; or the image will look stretched.
Correct monitor flicker
Another consideration in getting the best possible display from your monitor is the screen refresh rate. If the refresh rate is too low, the monitor can flicker, which can cause eye strain and headaches. You should select a refresh rate of at least 75 Hertz. For more information about reducing or eliminating flicker, see Correct monitor flicker (refresh rate).
 Make sure the screen refresh rate is high enough to prevent monitor flicker
Set the color for an LCD monitor
LCD monitors display vivid color. To get the best color display from your monitor, make sure the color is set to at least 32 bit.
- Open Display Settings by clicking the Start button, clicking Control Panel, clicking Appearance and Personalization, clicking Personalization, and then clicking Display Settings.
- Under Colors, select Highest (32 bit), and then click OK.
The best display for a CRT monitor
For a CRT monitor, it's important to change the screen resolution to the highest resolution available that gives 32-bit color and at least a 72-Hertz refresh rate. For more information, see Change screen resolution. If the screen is flickering, or viewing the screen is uncomfortable, increase the refresh rate until you are comfortable with it. For more information, see Correct monitor flicker (refresh rate).
Resolution based on monitor size
Monitor size | Recommended resolution |
|---|---|
15-inch monitor | 1024 × 768 |
17- to 19-inch monitor | 1280 × 1024 |
20-inch and larger monitor | 1600 × 1200 |
Set the color for a CRT monitor
Windows colors and themes work best when you have your monitor set to 32-bit color. You can set your monitor to 24-bit color, but you won't see all the visual effects. If you set your monitor to 16-bit color, images that should be smooth might not appear correctly.
Set the color for a CRT monitor
- Open Display Settings by clicking the Start button, clicking Control Panel, clicking Appearance and Personalization, clicking Personalization, and then clicking Display Settings.
- Under Colors, select Highest (32 bit), and then click OK. (If you can't select 32 bit, check that your resolution is as high as possible, and then try again.)
Media Contact:-
Susheel Dhatwalia
info@leniotech.com or visit us at http://www.leniotech.com/
Susheel Dhatwalia
info@leniotech.com or visit us at http://www.leniotech.com/
Troubleshoot PDF printing | Not able to Print PDF Files
If you're having trouble printing a PDF, try the following steps. After each step, try printing the PDF again.
Note: If you recently updated to Acrobat 9.4.2, see Printing problems | Acrobat 9.4.2 update.
1. Print the file as an image.
If you’re in a hurry and want to print a simple document (such as a letter, a form, or a calendar), print it as an image. For more information, see PDF printing quick fix: Print as image.For more information, see PDF printing quick fix: Print as image
2. Update your printer driver.
Update the driver if the PDF doesn't print, prints as a blank page or with unreadable text, or if printing produces an error message.
- Find your printer’s model number.
- Go to the manufacturer's website, and browse or search for "drivers" or "printer drivers."
Driver download pages for popular manufacturers appear below:
- Find the correct driver for your model number.
- Download and install the printer driver.
- Restart your computer.
3. Copy the file to your hard drive.
Sometimes when you print a file that is on a thumb drive or a network, the file becomes damaged. Open the copy on your hard drive and print again.
4. Try to print a different PDF file.
- If you can print a different PDF, see step 6.
- If you can’t print a different PDF, see step 5.
5. Open a different program and try to print a different file.
- If you can print the file, restart your printer.
- If you can’t print the file, see step 9, "Check your printer connection."
6. Re-create the PDF file.
If you have the original file that the PDF was created from, and you have Adobe Acrobat, re-create the PDF.
a. Open the file in the original program (such as a word processing or a page layout program).
b. Choose File > Print, and then choose the option to save the file as a PDF.
a. Open the file in the original program (such as a word processing or a page layout program).
b. Choose File > Print, and then choose the option to save the file as a PDF.
7. Copy or download the PDF again.
If you don’t have the file that the PDF was created from, try either of the following steps.
Make a copy of the PDF.
Choose File > Save As and give the file a new name. Include only letters and numbers in the filename. Do not include symbols such as %, $, or [].
Download the PDF again.
If you downloaded the PDF from the Web or received it in an e-mail, download the PDF again. Or, ask the sender to resend it.
8. Try printing the PDF using another printer.
If you can print using another printer, see next step 9, "Check your printer connection."
9. Check your printer connection.
a. Ensure that the cable that connects your printer to your computer is securely plugged in.
b. If your printer is plugged into a USB hub, then unplug the printer cable from the hub.
Plug the printer cable directly in to a USB port on your computer.
c. Ensure that your printer is turned on.
d. If your printer was already on, turn it off. Wait 15 seconds, and then turn it on again.
e. Try and print again. If your file still doesn't print, see step 10, "Restart your computer."
10. Restart your computer.
11. Use the current version of Adobe Reader or Acrobat.
Download the current version of Adobe Reader or Acrobat at the Adobe Product updates site. Or, in Adobe Reader or Acrobat, choose Help > Check For Updates.
Monday, August 8, 2011
Steps To Speed up a Slow PC
- Make sure your computer has at least 500MB of free hard disk drive space. If your computer has less than 500MB free, it may cause the computer to operate more slowly. Try regaining hard disk drive space.
- Run Microsoft Scandisk and Defrag on the computer. Additional information and help with these commands can be found on our scandisk page and our defrag page.
- Close any programs that are running in the background or disable background programs from automatically loading each time your computer boots. Information about doing this can be found in document CHTSR.
- Click Start, Search, and click For Files or Folders. In the search window, search for files named *.tmp and make sure you are searching or looking in the local C: drive. Once search has completed, delete any files found.
- Ensure that no errors or conflicts exist in the Device Manager.
- Make sure Windows XP is up-to-date by checking Microsoft Windows update page.
- Delete all files in your Windows Prefetch directory. These files can lower overall system resources if loading programs no longer being used. See the prefetch definition for additional information about prefetch.
- Verify your computer has the latest drivers for the hardware devices installed in your computer.
- If your computer has a virus protection program installed, make sure it is up to date and that no viruses are being detected. If your computer does not have a virus protection program, you may wish to consider installing a program to make sure no viruses are causing your problems. Information about updating your antivirus program can be found on document CH000533 and information about what antivirus programs are available can be found on document CH000514.
- If your computer has worked fine in the past but recently has been experiencing this issue, run the System Restore option to restore the computer to an earlier date. Information about how to do this can be found on document CH000589.
Diagnose Boot Problems In Windows XP Using MSCONFIG
The System Configuration Utility is easy to use and will help you troubleshoot a wide variety of Windows XP boot problems. The ease with which you can temporarily modify the boot files, system services, and startup files makes MSCONFIG an extremely useful troubleshooting utility. The best troubleshooting features I have found are the boot options located within the BOOT.INI tab. Remember to use caution when manipulating boot option parameters and always write down any changes you make in case you get stuck.
Launching MSCONFIG
To use MSCONFIG, click the Start button and select Run. In the Open box, type MSCONFIG and click OK. The utility will open, as illustrated in Figure A.
Figure A

You must be logged on to the computer using an Administrator account before you can run MSCONFIG.
The MSCONFIG window contains six tabs: General, SYSTEM.INI, WIN.INI, BOOT.INI, Services, and Startup. We’ll take a closer look at each of these tabs in the following sections.
The General tab
The MSCONFIG General tab gives you some basic options for starting a computer. As shown in Figure A, the default setting for the utility is Normal Startup. The other two options for starting the computer are Diagnostic Startup and Selective Startup.
Diagnostic Startup allows you to start the computer with only the most basic devices and services that are needed for the computer to run. This startup gives you a clean environment for troubleshooting.
Selective Startup provides a variety of startup options that you can use for troubleshooting. By default, all the options under Selective Startup are chosen. However, deselecting one of these preselected options allows you to prevent one or more of the Selective Startup options from running.
For instance, if you think one of the programs that launch on startup is causing a problem, you can deselect the Load Startup Items option to prevent any startup program from launching. While this won’t help you determine which program is causing the problem, it will help you isolate the problem to a certain area. Please note that you’re unable to select the Use Modified BOOT.INI file unless you make a change on the BOOT.INI tab, which I’ll discuss later.
Finally, the Launch System Restore button provides easy access to the System Restore function, and the Expand File button is a very useful feature if you encounter a corrupted file and want to restore it.
The SYSTEM.INI and WIN.INI tabs
The SYSTEM.INI and WIN.INI tabs are included for legacy compatibility, and you may not need to use them very often. These tabs give you the ability to modify the SYSTEM.INI and WIN.INI files or prevent lines of code from executing when the computer is started.
In Figure B, each line of the SYSTEM.INI file is displayed in the window. Sections of the file, such as drivers, are expandable to allow you to work with the lines of code in those sections. You can also deselect a section to prevent the entire section from being executed.
Figure B

Deselect a section to prevent the entire section from being executed.
The Move Up and Move Down buttons allow you to move lines or sections to other locations in the file. The Find button is used to search the file; the New button lets you add new lines; and Edit lets you change the value of a line. The Enable All and Disable All buttons at the bottom of the window will select or deselect all the lines of the program. Using these buttons to alter these files is much easier and safer than using a text editor to perform the same tasks.
As you can see in Figure C, the WIN.INI tab provides the same functionality as the SYSTEM.INI tab.
Figure C

Same as before, select and deselect.
Boot options using the BOOT.INI tab
The BOOT.INI tab, shown in Figure D, gives you many options for starting the computer. The top portion of the window contains the BOOT.INI file that the computer is currently using. You cannot edit this file using MSCONFIG. You can change the timeout value for the boot menu. Even if you can’t edit the file, it is easy to view the file when you use MSCONFIG.
Figure D

Microsoft recommends that you don’t attempt to use MSCONFIG to edit BOOT.INI unless you’re directed to do so by a Microsoft Certified professional.
Three of the four buttons provided in this window are for editing purposes and are grayed out by default. The Check All Boot Paths button is used to verify that the boot paths in the BOOT.INI file are correct. When you click this button, you’ll receive either an error message you can use for troubleshooting or a window alerting you that the boot paths have been verified.
Boot option pane
The most valuable functions on the BOOT.INI tab are the boot options, which are explained below. You can use these choices for a variety of troubleshooting techniques:
- /SAFEBOOT gives you suboptions for starting the computer.
- /SAFEBOOT with MINIMAL starts the computer in Safe Mode.
- /SAFEBOOT with NETWORK starts the computer in Safe Mode with networking support.
Note: /SAFEBOOT with NETWORK does not load the normal network configuration; instead, it loads a generic TCP/IP network configuration. - /SAFEBOOT with DSREPAIR is used to repair Directory Services on Domain Controllers.
- /SAFEBOOT with MINIMAL (ALTERNATESHELL) starts the computer in Safe Mode with Command Prompt.
- /NOGUIBOOT starts the computer without the VGA video driver that displays graphics during the boot process and Blue Screen crash information.
- /BOOTLOG enables boot logging to help you debug and troubleshoot startup problems.
- /BASEVIDEO starts the computer using a standard VGA video driver, as opposed to the one installed for the graphics card.
- /SOS causes the driver names to be displayed when they’re loaded. You can use this switch to diagnose driver-related issues.
- /MAXMEM limits the amount of memory that Windows XP can use. You can use this switch if you believe that your system has a bad memory chip.
- /NUMPROC limits the number of processors used in a multiprocessor system.
- /PCILOCK stops Windows XP from dynamically assigning system resources to PCI devices. The devices will use the BIOS configuration instead.
- /DEBUG starts the computer in debugging mode. It allows you to configure the machine with three additional suboptions, as follows:
- /DEBUG with /DEBUGPORT specifies the communications port to be used for debugging.
- /DEBUG with /BAUDRATE specifies the baud rate to be used for debugging. The default baud rate is 9600 with a modem and 19200 with a null-modem cable.
- /DEBUG with /CHANNEL specifies the 1394 communications channel for debugging.
Figure E

These are the advanced options.
Working with the Services tab
The MSCONFIG Services tab, shown in Figure F, allows you to prevent specific services from starting when the computer is started. This is extremely useful when you’re troubleshooting service-related problems.Figure F

Microsoft has designed the majority of services in Windows XP. To make it easier to find a non-Microsoft service, you can select the Hide All Microsoft Services option.
Troubleshooting using the Startup tab
The Startup tab lets you prevent items in your startup folder from starting when you log in. As you can see in Figure G, you can simply deselect the service to prevent it from starting. If you want to disable all the services, click the Disable All button. To enable all the services again, click the Enable All button.
Figure G

How to Improve Windows Explorer Using Folder Options
Windows 7 introduces a brand new WindowsExplorer with many changes versus its predecessors. Browsing and working with your files and folders has never been easier and more pleasant in the Windows world. Even so, there is always room for improvement by tweaking the configuration of the Folder Options menu. In this article I will show you where to find Folder Options and which are the key configuration options which can improve your experience with WindowsExplorer.


Where to Find the Folder Options Menu
Finding the Folder Options menu can be done in several ways. One of them is to open the Control Panel and go to Appearance and Personalization -> Folder Options.

Another way is to open Windows Explorer and go to Organize -> Folder and search options.
A third alternative would be to search for 'folder options' in the Start Menu search box and click on the appropriate search result. Once launched, the Folder Options window looks like in the screenshot below. If you are familiar with previous versions of Windows, you will notice the Folder Options window has changed and now it offers a different set of options and tabs.
In the next chapter we will go through each one of the tabs and highlight important configuration items which can improve the way you work with Windows Explorer.
The General tab has a very limited set of configuration options. You can set Windows Explorer to open each folder in the same window or in a different one or you can change the way you open items (via a single-click or a double-click). The most interesting option is the last one, regarding the navigation pane. If you check the two check-boxes highlighted below, Windows Explorer will show all folders when you open it and will automatically expand to current folder. This can be very useful to some users as it helps them navigate faster through their folders.
The View tab has lots of configuration options about the way files and folders are shown in Windows Explorer. Some of the most important options are the following:
· Always show icons, never thumbnails - this option can be useful when you are working with a large number of files and folders and your computer is rather slow when loading all their thumbnails. By checking this option, Windows Explorer shows only icons and stops loading thumbnails, which leads to speed improvements when browsing through your files and folders.
· Hide empty drives in the Computer folder - when this option is checked, if you insert an USB memory stick or any other drive which is empty, it will not be shown in your Computer folder. This can sometimes lead to confusion if your drive was installed and detected properly. Unchecking this option is highly recommended.
· Hide extensions for known file types - unchecking this option allows you to see file name extensions as parts of file names. This is a good way to ensure that files are not viruses or other malicious software disguised as normal files such as documents or pictures. There are many viruses which apparently have a safe file extension. They are named something like filename.doc.exe. If this option is checked, you will only see filename.doc and you might believe it is a safe file to open. Unchecking this option is highly recommended.

Use check boxes to select items - by checking this option, when you place your mouse on the top of a file or folder, you will see a small check box. This can be useful for easier selection of several items at once. It is the equivalent of holding down the CTRL key while clicking on multiple items to select them.
· When typing into list view - here you have two options, depending on the behavior you want. By default, when you type a letter, Windows Explorer will select the first file or folder which has a name starting with that letter. When found, the item will be automatically selected. If you want to change this behavior and you want to automatically search in the upper-right search box, select the first option which says 'Automatically type into the Search Box'.
The Search tab has configuration options about the way you can search for files or folders in Windows Explorer. The default configuration works very well. However, if you are not satisfied you can experiment with the available options and see if they improve your experience.
Conclusion
The tips shared here managed to improve my own experience with Windows Explorer and now I enjoy it even more. Actually, it is the first time I don't feel the need to use Total Commander, one of the best file managers you could find. If you have other good tips & tricks to share, don't hesitate to leave us a comment.
Media Contact:-
Susheel Dhatwalia
info@leniotech.com or visit us at www.leniotech.com
Susheel Dhatwalia
info@leniotech.com or visit us at www.leniotech.com
Subscribe to:
Comments (Atom)